


As an Amazon Services LLC Associates Program participant, we earn advertising fees by linking to Amazon, at no extra cost to you.
Adjusting Tensions for Perfect Stitches
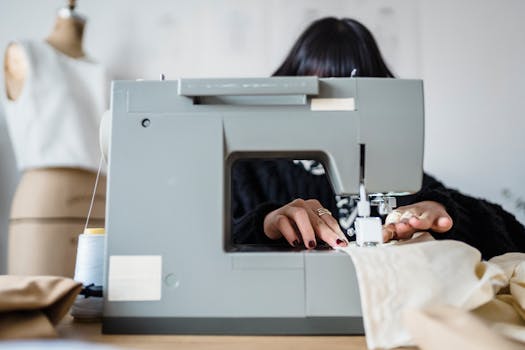
Getting the tension right can mean the difference between a frustrating sewing experience and achieving those perfect stitches. Always start by consulting the user manual for your sewing machine; it provides the tension settings recommended for various fabrics. I’ve found that working with different materials requires different tensions. For lightweight fabrics, I often lower the tension to avoid puckering, while heavier fabrics usually need increased tension to secure the stitch. Don’t be afraid to experiment—adjusting tensions in small increments can lead to impressive results. Watch how the stitches look on the fabric; if they seem too tight or are forming loops on the underside, it’s time for a tweak. Personally, I maintain a scrap fabric pile specifically for testing stitches before committing to my final project. Also, remember that the type of thread can affect tension; higher quality threads often yield better results. Finally, regular maintenance of your machine is crucial, as dust and lint buildup can throw off your tension settings significantly.
Understanding the Cover Stitch Machine
A cover stitch machine is essential for anyone serious about garment construction. It creates a clean, professional-looking finish on hems and seam allowances, which is something a conventional sewing machine simply cannot achieve. Unlike regular sewing machines that form a single thread stitch, the cover stitch machine uses multiple threads to provide a stretchy, durable stitch ideal for knit fabrics.
Operating this machine can initially seem daunting, but once you get the hang of it, you’ll never look back. The key features include multiple needle options and a customizable stitch length, which grants you the flexibility to adjust depending on the fabric type. I highly recommend investing the time to master this unique machine, as it opens up new avenues for creativity in your sewing projects. Additionally, threading can be a challenge, but there are plenty of tutorials available that simplify the process. Understanding how to maintain and troubleshoot your cover stitch machine will ensure its longevity and reliability.
Maintaining Your Cover Stitch Machine
To keep my cover stitch machine running smoothly, I prioritize regular maintenance. First and foremost, I clean the machine after each use. Dust and lint can build up quickly, clogging the mechanisms and affecting performance. I use a soft brush and a small vacuum attachment to get into tight spaces. Oiling the machine is also crucial. I refer to the manual for guidelines on where to apply oil, ensuring the parts move freely and efficiently. Changing the needles regularly is another key practice. Dull needles can snag fabric and break threads, ruining my projects. I replace them at least every few projects or sooner if I notice any issues. Finally, I always check the thread tension before starting a project. Correct tension is essential for a flawless finish. Following these steps ensures my cover stitch machine remains reliable, allowing me to focus on creativity without interruptions.
Creative Applications of Cover Stitching
Cover stitching opens up a world of creativity for sewing enthusiasts. I love using this technique on garments, especially for adding a polished finish to neckline bands and hems. The versatility of cover stitching allows you to play with different thread colors, creating eye-catching accents on otherwise plain fabrics. You can also experiment with decorative stitches to add visual interest to your projects. For instance, using contrasting thread can transform a simple T-shirt into a stylish piece that looks professionally finished.
Another great way I’ve utilized cover stitching is in crafting cozy loungewear. By layering fabrics and using the cover stitch for seams, I achieve a soft, stretchy feel perfect for relaxation. You can make everything from leggings to sweatshirts with this simple yet effective technique. Additionally, exploring cover stitching on home decor projects, like pillowcases or table runners, allows you to infuse personal style into your living space. The creative possibilities are endless!
Practice on scrap fabric before starting a project.
Practicing on scrap fabric can save time and materials while enhancing your skills.
- Testing stitches and techniques on scrap fabric allows me to get comfortable with my machine or tools.
- Using leftover fabric ensures I’m not wasting my precious project materials.
- I can experiment with different thread colors and tensions without the risk of ruining my main fabric.
- Practicing on scraps helps me determine the right seam allowances and finishing techniques that look best.
- Mocking up the pattern can reveal any fitting issues before cutting into my main fabric.
- I find it useful to try out new patterns or styles on inexpensive fabric before committing fully.
- Keeping a stash of scrap fabric lets me build confidence in my sewing skills without pressure.
- Practicing helps me create a mental checklist of steps, which I can reference during the main project.
Essential Tools for Effective Cover Stitching
A quality cover stitch machine is indispensable. This type of machine provides the ability to create professional-looking hems, which is crucial for knit fabrics. I can’t stress enough the importance of having one that allows for adjustable stitch length and width. Additionally, using the right type of needles is essential. Opt for ballpoint needles when working with knits; they glide smoothly through the fabric. You’ll also need a sturdy pair of fabric scissors for accurate cutting and shaping. Regularly changing the thread will enhance the quality of your stitches, so invest in good quality thread that matches your fabric. Furthermore, a pressing tool can make all the difference in achieving a crisp finish on your garments. I always keep a measuring tape handy to ensure proper alignment. Finally, don’t underestimate the power of a good manual—having a guide specific to your machine can save you from many frustrations.
Benefits of Using a Cover Stitch Machine
Exploring the advantages of incorporating a cover stitch machine into your sewing toolkit.
- Professional Finish: The cover stitch machine offers an unmatched professional finish, especially on knit fabrics. I love how it mimics the look of ready-to-wear garments, making my projects appear polished and polished.
- Versatile Stitching Options: With the ability to create two or three needle stitches, a cover stitch machine provides a range of options for different types of seams and hems. This versatility allows me to experiment with creative designs and methods.
- Stretch and Recovery: One notable feature is the ability to maintain the fabric’s stretch. This is a critical advantage when working with knits, as the stitches allow the fabric to move without breaking, giving my garments excellent recovery.
- Speed and Efficiency: Cover stitch machines are typically faster than regular sewing machines when it comes to hemming. I find that my projects come together swiftly, which is perfect for keeping my creative momentum going.
- Cleaner Edges: Using a cover stitch machine helps me achieve cleaner edges, reducing the need for additional finishing techniques. This saves time and gives my projects a neat and tidy appearance.
Aug 5, 2023 … Although both use needles and loopers to make the seam, they have other functions. A cover stitch machine mainly serves for hemming but not …
Tips for Sewing Different Fabrics
Choosing the right needle is crucial. For lightweight fabrics like silk, use a fine needle, while thicker materials like denim require a heavier needle. Always test your stitches on a scrap piece. This practice helps you adjust tension and stitch length before working on the main fabric. Consider the fabric’s stretch. For knits, a walking foot can help prevent slipping, ensuring even stitches. Use ballpoint needles for knits to avoid damaging the fibers. Don’t underestimate pins and clips. Fabric types like chiffon or lace benefit from lighter-weight pins, whereas heavier fabrics are fine with standard pins. For slippery fabrics, try using fabric clips instead. Stabilizers are your friends. Use them with stretchy or lightweight fabrics for added support. Lastly, adjust your machine settings based on the fabric type to avoid puckering or uneven seams.
Oct 9, 2022 … Fix problems with your coverstitch machine • Coverstitching: Fix pr… ⚙️ Reviews of coverstitch machines and accessories • Coverstitch …
Perfect Coverstitch Hemming: 7 Tips That Makes A Huge Difference …
Jan 29, 2017 … I cover everything from choosing and inserting needles to the best threading practice and how to secure the seams. Because sometimes sewing with …
Sewing with a coverstitch machine – a step-by-step guide – The Last …
Apr 21, 2019 … Having problems with your coverstitch machine? Learn how to fix common problems such as skipped stitches, tension problems and uneven …
8 Tips for Successful Coverstitching: Master the Coverstitch Machine …
Jan 6, 2017 … Christmas gifts I received recently included a Janome CoverPro 2000CPX cover stitch machine… something I had been dropping lots of hi…
Dec 30, 2014 … It does a beautiful job on super stretchy fabrics like swimwear & aerobic wear. Amazingly the seams are super stretchy with using regular polyester/cotton …
Recommended Cover Stitch Machines for Beginners
Choosing a cover stitch machine can significantly enhance your sewing projects, especially for adding professional finishes. Here are some great options for beginners.
- Brother 2340CV Coverstitch Machine: This machine is user-friendly, providing easy threading and adjustable stitch width, perfect for novices who want to work with knits and stretch fabrics.
- Janome CoverPro 1000CPX: The Janome model offers excellent stitch quality and a wider throat space, making it suitable for larger projects while being straightforward to use.
- Singer Professional 5 14T968DC: While technically a serger, this machine has a cover stitch option as well, making it a versatile choice for beginners who want to experiment with different techniques.
- Baby Lock Enlighten: Known for its easy air threading, this machine simplifies the process and is an ideal choice for those who want to dive into cover stitching without fussing over complicated setups.
- Elna 664 Pro: With its user-friendly features and reliable performance, it helps new sewists gain confidence in their skills while creating beautifully finished garments.
Keep your machine clean and well-oiled.
Essential tips for maintaining your crafting machines for optimal performance.
- Regularly clean your machines to prevent dust and debris buildup. I can’t stress enough how a clean machine operates smoothly and produces better results.
- Use the right cleaning supplies. Avoid harsh chemicals that can damage surfaces; instead, opt for gentle cleaners suitable for your machine’s material.
- Oil moving parts as needed to reduce friction. A well-oiled machine runs quieter and lasts longer, making a noticeable difference in performance.
- Follow the manufacturer’s guidelines. Each machine has specific maintenance requirements, and sticking to these can save you from costly repairs.
- Conduct routine inspections. Check for loose screws or worn belts; catching these issues early can prevent further damage.
- Keep your workspace organized. A tidy space reduces accidents and makes it easier to maintain your machines.
Always use the right type of fabric for best results.
Choosing the appropriate fabric can make all the difference in your crafting projects.
- Consider the project’s purpose. If it’s apparel, opt for breathable fabrics like cotton. For decorative items, explore heavier materials like canvas or burlap.
- Evaluate the fabric’s texture. Smooth fabrics like satin work well for elegant projects, while textured materials like linen add depth to your pieces.
- Take into account the washing and maintenance demands. Some fabrics are machine washable, while others may require dry cleaning, impacting your project’s practicality.
- Select fabrics based on their drape and weight. Lightweight fabrics are great for flowy designs, while heavier ones are better suited for structured items.
- Don’t overlook the color and pattern. The right visual elements can elevate your work, matching the aesthetic you’re aiming for.
Troubleshooting Cover Stitch Issues
Cover stitch problems can be incredibly frustrating. The most common issue I face is skipped stitches. Typically, this occurs due to incorrectly threaded machine parts, so double-checking the threading is essential. Ensure the needle threads are seated properly, and the tension is set correctly. Another frequent issue is the stitch being too loose or too tight. This can be adjusted by manipulating both the lower looper and needle tension settings until I achieve the desired balance. If you’re facing trouble with fabric feeding, check if the presser foot is creating adequate pressure. A dirty machine can also lead to poor stitch quality. Regularly cleaning the feed dogs, plate, and needle area is crucial to optimum performance. Lastly, if you notice thread breakage, confirm you’re using the right type of thread and needles for your fabric. Addressing these points will often resolve most cover stitch issues.
Choosing the Right Needles and Threads
Selecting the right needles and threads can make or break your crafting experience. Different materials and projects require different types. For sewing, I swear by universal needles for most fabrics, but for delicate materials like silk, a fine needle is essential. Never underestimate the importance of needle size. A larger needle can create holes in your fabric, while a smaller one might struggle to penetrate thicker layers. Thread choice is equally crucial. I prefer cotton threads for their strength and durability, but when working with stretchy fabrics, a polyester thread is a must to prevent breakage. Always consider the weight of both the thread and fabric; a heavy fabric deserves a thicker thread. For embroidery, selecting specialty threads like floss or metallic can add dimension and flair to your projects. Make a habit of testing your needle and thread combinations on scraps before starting your main piece; this simple step has saved me countless frustrations!
Common Mistakes and How to Avoid Them
One of the biggest mistakes I see is not reading through the entire tutorial before starting. Rushing into a project without understanding all the steps can lead to unforeseen complications and wasted materials. Always gather all your materials first. I’ve been caught out by missing supplies, which derailed my creative flow and made the process frustrating. Another common pitfall is overlooking the importance of choosing the right materials. Using subpar items can compromise the quality of your work. Don’t be afraid to experiment, but do it moderately. Overcomplicating a project by adding too many techniques can lead to chaos instead of creativity. Lastly, always set realistic deadlines for yourself. Trying to rush a project often ends in disappointing results and unmet expectations. Embrace the process and take your time to truly enjoy your craft!
What is the difference between a cover stitch and a regular sewing machine?
A cover stitch is specifically designed for hemming and finishing edges, providing a professional finish that stretches with the fabric. Unlike a regular sewing machine, which operates with one or two threads primarily for straight stitching, a cover stitch typically uses two needles and a looper. This allows it to create a flat, secure seam on knit fabrics, making it essential for sewing items like t-shirts and activewear. While a regular machine offers versatility for various types of sewing projects, it lacks the specialized capabilities of a cover stitch, particularly for knitted materials.
Is it necessary to use special needles for a cover stitch machine?
Yes, it is essential to use special needles designed for cover stitch machines. These machines require needles that can accommodate the unique stitch formation and tension involved in cover stitching. Regular sewing machine needles won’t perform well and can lead to skipped stitches or even damage to the fabric. Using the correct needles ensures optimal performance and longevity of both your fabric and machine. Choose needles specifically labeled for cover stitching, typically ballpoint or jersey needles, for the best results.
What should I do if my cover stitch machine skips stitches?
First, check your tension settings. Inconsistent tension can easily lead to skipped stitches. Next, inspect the needle; it should be the correct size and type for the fabric you’re using. A dull or damaged needle is often the culprit. Additionally, ensure your thread is threaded correctly and isn’t tangled. Also, regularly clean your machine to prevent lint buildup. Lastly, consider the fabric weight and type; heavier fabrics may require different settings. Address these issues systematically for the best results!
Can I use a cover stitch machine for hemming?
Absolutely, a cover stitch machine is ideal for hemming. I use mine for a variety of fabrics, especially knits, and it provides a professional finish. The cover stitch creates a strong, flexible seam that stretches without breaking, which is crucial for garments that need to move. It also offers the benefit of a clean look on both sides of the fabric. Just make sure to adjust your tension and stitch settings according to your fabric type for the best results.
How do I clean and oil my cover stitch machine?
First, unplug your machine for safety. Remove any fabric and threading before cleaning. Use a small brush to remove lint and dust from the feed dogs, looper area, and around the needle. A vacuum can be useful for stubborn debris. After cleaning, apply a few drops of the appropriate sewing machine oil. Focus on the moving parts, such as the needle bar and hook area, ensuring you don’t over-oil. Wipe off excess oil with a cloth. Follow your machine’s manual for specific guidance and oiling points, since different models may have unique needs.
How can I troubleshoot common issues with cover stitches?
First, check your needle and thread type. Using the wrong combination can lead to skipped stitches. Tension issues are another major culprit. Adjust the tension settings and test on scrap fabric. If stitches are loose or gather fabric, increase tension. Ensure your machine is properly threaded. A misthreaded cover stitch can create a mess. If you notice thread breaks, check for sharp edges on the machine that could be snagging the thread. Regular maintenance is key; keep the machine clean and oiled.
What types of fabric work best with a cover stitch machine?
Knit fabrics are ideal for cover stitch machines. They provide the necessary stretch and recovery, ensuring that seams remain flexible and durable. Cotton-Lycra blends also work well, offering comfort with a bit of give. Additionally, fabrics like jersey and interlock are fantastic choices for T-shirts and activewear. Avoid heavy or non-stretch materials, as they can cause skipped stitches and uneven tension. Ultimately, choosing the right fabric will enhance the function and finish of your projects.
A well-configured sewing machine drastically enhances stitch quality. Make sure to calibrate tension, use the right needle, and choose appropriate thread. These simple steps can transform your projects.
Choosing the right settings for your fabric is crucial. Each type—cotton, silk, polyester—has specific needs for heat and tension. I’ve learned that experimenting can lead to the best results.
Mastering stitch types transforms basic projects into stunning creations. The right stitches add texture, strength, and flair, enhancing every piece you make.
**Regular maintenance is essential; it prevents wear and tear, ensuring optimum performance.** I’ve seen firsthand how a little care can lead to a longer, more reliable crafting experience.
Experimenting with new techniques can lead to unexpected and exciting results. I often find that the most fulfilling projects come from trying something outside my comfort zone. Never hesitate to mix materials or methods!
As an Amazon Services LLC Associates Program participant, we earn advertising fees by linking to Amazon, at no extra cost to you.


