


As an Amazon Services LLC Associates Program participant, we earn advertising fees by linking to Amazon, at no extra cost to you.
Comparing Coverstitch vs. Regular Sewing Machines
Coverstitch machines are specialized for hem finishing and provide a professional look, perfect for stretchy fabrics. I appreciate the double or triple needle option for creating strong, flat seams that keep garments looking polished. On the other hand, regular sewing machines are incredibly versatile. They can handle a wider range of techniques, from straight stitching to intricate embroidery. While a regular machine might give you a lot of flexibility, it falls short for knit hems compared to a coverstitch. If you frequently sew knitwear or want to achieve a store-bought finish, a coverstitch machine is worth considering. However, if you’re looking for an all-in-one sewing tool and don’t primarily work with knits, a regular machine is more practical. Ultimately, your choice should reflect the types of projects you enjoy most.
Limitations of Coverstitch for Topstitching
While coverstitch machines offer unique functionalities, they come with notable limitations for topstitching. First, coverstitch is primarily designed for hemming and spans, which may compromise the precision needed for detailed topstitching. This can lead to uneven stitches, particularly in thicker fabrics or layers. Furthermore, the machine tends to produce less defined stitch lines compared to a standard straight stitch. The lack of a feed dog mechanism can cause fabric to shift, resulting in puckering and misalignment. I have found that trying to use coverstitch for intricate designs often leads to frustration due to its limited agility with smaller, tight curves. Additionally, the threading can be complex and time-consuming, especially for beginners. For those wanting crisp, clean lines on projects, traditional sewing machines present a more reliable option. Lastly, not all fabrics are suitable for coverstitching, particularly heavier or textured materials, which can hinder the end result significantly.
Suggested Fabrics for Coverstitch Topstitching
Here are some fabric suggestions that work exceptionally well for coverstitch topstitching, ensuring both functionality and aesthetics.
- Cotton Jersey: I find that cotton jersey is a fantastic choice due to its stretch and breathability. The smooth surface allows the coverstitch to glide effortlessly, producing clean, professional-looking seams.
- Bamboo Knits: Bamboo knits have a lovely drape and softness, making them a pleasure to work with. They hold their shape well and provide a natural sheen that highlights topstitching beautifully.
- Lycra/Spandex Blends: If you want to create athletic wear or fitted garments, Lycra blends are my go-to. They offer superior elasticity, ensuring that your topstitching doesn’t restrict movement or create puckers.
- Interlock Fabric: I appreciate using interlock fabric as it’s thicker than standard jersey and provides a stable base for topstitching. It doesn’t curl at the edges, which saves some hassle during construction.
- Rayon Challis: For lightweight garments, rayon challis is dreamy! Its soft drape pairs perfectly with a delicate touch of topstitching, adding visual interest without overwhelming the design.
- Tencel: Tencel has an incredible feel and drape that gives a high-end look to garments. It takes to topstitching gracefully, but the key is to use the right needle and thread for best results.
Tips for Effective Topstitching with a Coverstitch Machine
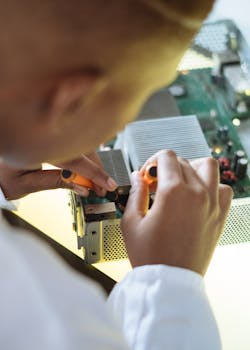
Choosing the right thread is crucial. Use a quality thread that matches your fabric type to get the best results. I prefer cotton for a softer look, while polyester offers durability. Maintaining proper tension is vital for neat results. Adjust the machine’s settings according to the fabric weight. A test stitch on a scrap piece can prevent unexpected surprises. Always align your fabric edges precisely. Use guides on your coverstitch machine to ensure even topstitching. Keeping the fabric taut but not stretched is key to avoiding wavy stitches. Experiment with stitch lengths and widths! A wider stitch adds a bold touch to your project, while a narrower stitch creates a delicate finish. Don’t hesitate to use the right presser foot that ensures good fabric feed; it can make all the difference in achieving that polished look.
Recommended Settings for Coverstitch Topstitching
Choosing the right settings for coverstitch topstitching is crucial for achieving a professional finish. I prefer using a 4-thread setup for optimal durability and flexibility. Set your needle tension to about 4 and your looper tension to 6; these settings create the right balance. For the stitch length, around 3.5 mm works best for standard fabrics, yielding a robust stitch without pulling the fabric. Experimenting with a slightly longer stitch, around 4 mm, can work wonders on thicker materials like denim. Be wary of fabric type; using a walking foot is beneficial on stretchy fabrics to prevent distortion. A 90/14 needle is my go-to choice for most projects, effectively piercing through multiple layers. Lastly, pay attention to your fabric’s feed; adjusting the differential feed to 1.0 is typical, but you might increase it slightly for knit fabrics to avoid gathers. Testing these settings on scrap fabric ensures you achieve the desired result before working on your main project.
What is Topstitching?
Topstitching is a decorative sewing technique that adds both style and reinforcement to seams or hems. I find it to be an essential skill in the world of sewing, as it dramatically enhances the overall appearance of a garment or fabric project. The process involves sewing a line of stitches on the outside of the fabric, often in a contrasting thread color to create visual interest. It serves practical purposes too, like securing layers of fabric and preventing them from shifting. I love how topstitching can be used on various projects, from apparel to home décor. To execute this technique, I usually use a longer stitch length and a special foot designed for topstitching, which helps achieve a professional finish. Experimenting with different colors and stitch patterns allows me to unleash my creativity! Whether I’m working on a simple tote bag or a more complex garment, topstitching is a straightforward way to elevate my sewing game.
Conclusion: Is it Worth It?
Engaging in arts and crafts can be a liberating and fulfilling experience. Personally, the benefits I’ve reaped from this creative outlet far outweigh any drawbacks. The time spent crafting is not just a hobby; it’s a meaningful escape from everyday life. Creating something with my own two hands brings an unparalleled sense of accomplishment and joy that commercial activities often lack. Whether I’m painting, knitting, or working on paper crafts, every project serves as a form of personal expression. The potential for self-discovery through creative endeavors is immense. Even the act of failure becomes a lesson, pushing me to refine my skills and explore new techniques. In my experience, the real value lies not in the finished product but in the process itself. Connecting with like-minded individuals within the crafting community amplifies this joy, providing inspiration and motivation. Overall, I believe investing time in arts and crafts is wholly worthwhile, yielding not just objects, but memories and skills that last a lifetime.
Project Ideas that Suit Coverstitch Machines
A coverstitch machine is perfect for finishing edges with a professional touch. Think about creating stylish knitwear like t-shirts or leggings, where the stretch and durability of the coverstitch are essential. I love using my coverstitch machine for hemming knit fabrics; the results are always immaculate and hold up really well. You can also use it for activewear projects, such as gym shorts or yoga tops, where comfort and stretch are key. Another fantastic idea is to make home décor items like pillow covers or table runners with a decorative hem. The unique stitch adds flair while ensuring longevity. Consider upcycling old garments by adding coverstitched hems to refresh their look—this is a fun way to breathe new life into your wardrobe. Personalize your projects with contrasting thread colors for added visual interest!
Oct 8, 2018 …How to sew seams and topstitch with a single needle in a coverstitch machine.
Chainstitch Seams and Topstitching with a Coverstitch Machine …
Sep 13, 2018 … 8 steps to successful topstitching · 1. Have a good sewing machine · 2. Use heavier or double thread in the needle · 3. Use the right presser foot.
Aug 5, 2019 … Chainstitching, using a topstitch needle and two needle threads for a thicker front/rightside of a chainstitch. Replaced the serger needle …
Jun 4, 2023 …I did the topstitching with a straight stitch; my machine has a … I'll have to see if I can find twin needles with a bigger eye for topstitch …
Any way to get topstitching with some give without a chain stitch …
Jul 19, 2020 … … you four variations of seam allowance placement for topstitching using your coverstitch. Each method can be used in various projects, though …
Coverstitch Machine Tutorial, Seam Allowance Placement for …
Topstitching enhances the durability and appearance of seams.
Topstitching serves as both a functional and aesthetic technique in sewing.
- Topstitching reinforces seams, significantly reducing the likelihood of fraying or splitting over time.
- It adds a decorative touch, creating visual interest that elevates the overall look of the garment or project.
- Utilizing contrasting thread can highlight the stitching, turning what could be a plain seam into a stylish design feature.
- The added layer of stitching also provides extra strength, making seams more resilient to stress and wear.
- In projects that experience frequent movement or tension, such as bags or outerwear, topstitching is essential for longevity.
- It’s an easy way to finish raw edges, giving a polished appearance to handmade items without requiring complicated techniques.
Consider fabric types when choosing a machine.
Understanding different fabric types is essential for selecting the right sewing machine.
- Cotton: I find cotton is the most versatile fabric and practically every machine handles it well. If you’re working primarily with quilts or garments, you’ll want a reliable machine with good stitch options.
- Silk: Don’t even think about using a basic machine for silk! You need a model that allows for delicate stitching and has adjustable tension to avoid puckering.
- Denim: When tackling heavy fabrics like denim, I recommend opting for a machine with strong motor power and a sturdy construction. This ensures clean seams without needle breakage.
- Knits: Stretch fabrics require a sewing machine that can handle elasticity. Look for features like a walking foot or stretch stitches to prevent distortion.
- Leather: I always vote for a heavy-duty machine equipped with the right needle for leather. Standard machines just can’t manage it well and risking damage isn’t worth it.
Coverstitch machines are designed for stretch fabrics.
Coverstitch machines excel in handling a variety of stretch fabrics, making them essential tools for sewers focused on knit projects.
- Specialized Stitching: Coverstitch machines provide a unique stitching technique that allows for flexibility and movement, crucial for garments made from stretchy materials.
- Professional Finish: These machines create the clean and polished hems you often see in commercial activewear and leisure clothing, elevating the quality of your projects.
- Easily Manage Various Fabric Types: They can handle a range of stretch fabrics, including jersey, spandex, and lycra, ensuring versatility in your sewing endeavors.
- Dual and Triple Needle Options: Many coverstitch machines offer the option to use multiple needles, allowing for decorative finishing and added sturdiness in seams.
- Prevents Fabric Distortion: The feed system of coverstitch machines helps maintain the integrity of stretch fabrics, preventing puckering and distortion during sewing.
Advantages of Using a Coverstitch Machine
Coverstitch machines are game-changers for anyone passionate about sewing. These machines provide a professional finish that is difficult to achieve with a standard sewing machine. The ability to create elongated, stretchy stitches makes them perfect for working with knit fabrics. I love how they allow for the construction of durable hems that won’t easily unravel, a significant advantage when crafting garments meant for wear. Another feature I appreciate is the twin needle option that enables simultaneous stitching on both sides of the fabric, resulting in a neat and polished look. Coverstitch machines also save time, providing quick and efficient ways to hem and finish seams in one pass. This is particularly beneficial for anyone making multiple items, such as a clothing line or bulk gifts. Overall, investing in a coverstitch machine enhances my sewing projects, elevating both functionality and aesthetics.
Common Mistakes to Avoid
Avoid these pitfalls in your arts and crafts journey to enhance your creativity and skills.
- Skipping the Planning Stage: I cannot stress enough how vital it is to plan your project. Jumping in without a clear vision often leads to frustration.
- Ignoring Quality Materials: Don’t be tempted to save money by using subpar supplies. The right materials can make a world of difference.
- Neglecting Instructions: I’ve learned the hard way that skipping steps in tutorials can lead to disappointing results and wasted time.
- Overcomplicating Designs: Simplicity has its own beauty. Trying to add too many elements can make your project look cluttered.
- Not Allowing Time for Drying: Patience is key! Rushing the drying stage can ruin your project entirely.
- Comparing Yourself to Others: Everyone starts somewhere. Focusing on your progress, rather than someone else’s, keeps the joy alive.
- Forgetting to Clean Up: A tidy workspace can clearly boost my creativity. A chaotic space stifles productivity and inspiration.
Understanding Coverstitch Machines
Coverstitch machines are a game changer, especially for those who love working with knit fabrics. These machines create professional-looking hems and finishes that are hard to achieve with a standard sewing machine. One of the standout features is the ability to sew a double needle effect that provides both a robust seam and a finished look on the right side, while the wrong side remains neatly finished with clean, parallel threads.
A coverstitch machine is particularly suitable for stretchy materials, as it allows for necessary give in the stitches without breaking. Unlike sergers, which trim fabric edges, coverstitch machines focus on the finishing processes, making them essential for garments requiring a polished touch.
Additionally, the learning curve is manageable; once you master the threading and stitch settings, you’ll be cranking out stylish pieces in no time. Whether you’re crafting activewear or casual tees, investing in a coverstitch machine is worth every penny for the enhancement it brings to your projects.
Can I use a coverstitch machine for woven fabrics?
Absolutely, you can use a coverstitch machine for woven fabrics, but it’s not the best choice. Coverstitch is designed primarily for knit fabrics, providing flexibility and stretch. Using it on woven fabrics can result in difficulty achieving a clean finish, as wovens lack the stretch required for optimal stitching. If you choose to use one, consider using a stabilizer to avoid puckering. For woven fabrics, a traditional sewing machine or serger usually delivers better results.
What is the difference between coverstitch and chain stitch?
Coverstitch and chain stitch may sound similar, but they serve different purposes. Coverstitch is typically used for hemming and finishing seams, giving garments that professional, stretchy finish often seen on knit fabrics. In contrast, chain stitch is often employed in the construction of certain garments and can easily be unraveled, making it ideal for basting and temporary stitching. Coverstitch consists of two needle threads and a looper thread, ensuring a neat finish on both sides, while chain stitch features a single needle with a looped thread on one side. Choosing between them really depends on your project needs.
Is topstitching necessary for all sewing projects?
Topstitching is not necessary for all sewing projects. While it can enhance the durability and finish of specific items like denim jeans or bags, not every project requires it. Consider your fabric type and the project’s purpose. For simpler garments or delicate fabrics, you might want to skip it to maintain a clean look. Ultimately, it’s a stylistic choice that should align with your design vision.
How do I maintain my coverstitch machine?
Regular maintenance is crucial for keeping my coverstitch machine running smoothly. I clean the machine after every significant project by removing lint and dust, especially from the feed dogs and bobbin area. Lubrication is equally important; I follow the manufacturer’s instructions on applying machine oil to moving parts. I also change the needles frequently, as dull needles can cause missed stitches or damage to my fabric. Lastly, I periodically check and replace the looper and needle threads to ensure the best stitch quality.
Are there specific needles for coverstitching?
Yes, there are specific needles designed for coverstitching. These needles typically have a rounded point, which prevents damage to the fabric while stitching. I always opt for double needles or triple needles when working with a coverstitch machine, as they are essential for creating that clean, professional-looking finish on hems and seams. The most commonly used sizes are 2.0mm and 4.0mm, but the choice depends on the fabric thickness. Utilizing the correct needles is crucial for smooth operation and achieving the best results. Using the wrong needle might lead to issues like skipped stitches or thread breakage.
Can I convert my sewing machine to do coverstitching?
Converting a standard sewing machine for coverstitching isn’t straightforward; it’s generally impractical. Most home sewing machines aren’t designed for this type of stitch, which serves primarily for hemming and finishing knits. If you want to achieve true coverstitch functionality, investing in a dedicated coverstitch machine is often the best choice. Some accessories and attachments claim to add coverstitch capabilities to regular machines, but they usually fall short on performance and ease of use. I recommend thoroughly researching your specific machine model first—some advanced models may offer a coverstitch function or attachments that are minimally effective.
What settings should I use for topstitching?
For topstitching, I always set my sewing machine to a longer stitch length, around 3.5 to 4.0 mm. This gives a nice, visible finish. Using a contrasting thread color makes your topstitching stand out. I also recommend a universal needle—size 90/14 is perfect for most fabrics. If you’re working with heavier materials, like denim, switch to a denim needle for optimal results. Finally, use a walking foot for even feeding, especially on thicker layers. Take the time to experiment for your project’s desired look.
A coverstitch machine is invaluable for achieving professional-looking topstitching. **I often rely on it for hemming knits and adding decorative seams.** Its unique stitch capabilities offer durability and flexibility that standard sewing machines can’t match.
**Knowing your machine’s features impacts project outcomes.** Whether it’s speed, power, or specific functions, understanding these aspects helps in selecting the right tool for every craft.
Choosing the right settings can drastically improve your art and craft outcomes. I’ve experienced firsthand how lighting, workspace organization, and the right tools elevate creativity and precision.
Coverstitch is critical for achieving professional-looking hems on knit fabrics. It allows for stretchiness and durability without compromising the fabric’s integrity, which is essential for comfortable wear.
**Topstitching can easily be accomplished with a regular sewing machine.** I often achieve professional-looking results with a straight or zigzag stitch instead of relying solely on a coverstitch machine.
**Experimentation is essential.** I’ve learned that trying new techniques can lead to incredible breakthroughs in creativity. Don’t shy away from testing different materials or methods; the best projects often come from unexpected outcomes.
Connecting with our community is invaluable. **Sharing tips and personal stories enriches our creative journey.** You’ll gain insights and encouragement, fostering your artistic growth and confidence.
As an Amazon Services LLC Associates Program participant, we earn advertising fees by linking to Amazon, at no extra cost to you.


