As an Amazon Services LLC Associates Program participant, we earn advertising fees by linking to Amazon, at no extra cost to you.
Creative Customization Ideas for Your Stocking
Putting a personal touch on your stocking can make the holidays feel even more special. Try using fabric paint to add names or festive designs to plain stockings. If you’re feeling crafty, consider sewing patches representing hobbies or interests. Using embellishments like pom-poms or ribbons can instantly uplift a basic stocking. Another fun idea is to create a stocking theme; how about a cozy hot chocolate theme with marshmallow ornaments? Stitching your family’s favorite symbols or icons into the fabric can create a unique heirloom piece. Think about incorporating your kids’ drawings—transfer them onto fabric or felt to create a delightful surprise. Get creative with colors that match your holiday décor, ensuring that every stocking is uniquely beautiful. By customizing stockings, you’re not just decorating; you’re crafting lasting memories.
Inspiration from Other Crafters
It’s incredible how much creativity can spread just by sharing ideas with fellow crafters. Every time I browse through social media or craft forums, I discover fresh approaches and unique materials that ignite my passion for creating. I often draw motivation from the projects completed by others, be it a stunning knitted scarf or an intricate paper craft. Their artistry not only inspires but challenges me to expand my own skill set. Collaboration thrives in crafting communities, where beginners and veterans alike share their triumphs and struggles. Many tutorials I’ve come across have radically shifted my perspective on what’s possible in my craft. The joy of crafting lies not only in the finished product but in the connections and shared experiences. So, let the work of others fuel your imagination, encourage experimentation, and transform your artistic endeavors into something uniquely yours.
Different Styles and Themes Available
Explore a variety of artistic styles and themes to find your creative niche.
- Whimsical crafts that celebrate playfulness and imagination can add a delightful twist to your projects.
- Minimalistic designs focus on simplicity and function, allowing your skills to shine without unnecessary clutter.
- Nature-inspired themes bring the beauty of the outdoors into your work, using organic materials and earthy colors.
- Vintage styles evoke nostalgia and charm through retro patterns, colors, and techniques that tell a story.
- Abstract art encourages experimentation with colors and shapes, breaking away from traditional forms and celebrating creativity.
- Cultural crafts introduce unique techniques and traditions from around the world, enriching your art with diverse influences.
- Seasonal projects allow you to create specific pieces that celebrate holidays or changing seasons, blending artistry with festivity.
Switch to the basic mobile site. … Back to working on #bucilla “Airplane Santa” Felt Stocking today and this cute little #bucillastampedembroidery kit .
Dec 20, 2021 … Help! A few years ago my husband bought me several of the Bucilla Stocking kits to work on in the evenings. This summer I had started the …
Sep 27, 2016 … … site. … Show more. Necessary Always … “Or, “Am I supposed to separate the embroidery floss into separate threads for the stocking kit?
Everything I Wish I’d Known Before Starting My Christmas Stocking …
Aug 20, 2020 … Bucilla Felt Applique 18" Stocking Making Kit, Classic Christmas, Perfect for DIY Arts and Crafts, 89532E …
MerryStockings is the best source online for Bucilla felt Christmas crafts, get yours today and join our MerryRewards page to save $ on future orders.
Bucilla Felt Christmas Stocking Kits, DIY Christmas crafts …
Showcasing Your Completed Stocking
Completing a stocking is a labor of love, and showcasing it is a celebration of your creativity. Whether you’ve knitted, embroidered, or crafted it from paper, your finished product deserves to shine. I believe that sharing your work isn’t just about showing off; it’s about connecting with others who share your passion. Post it on social media, or join our community gallery—don’t hesitate! Highlight the details that make your stocking unique. Close-ups of intricate stitches or special decorations can inspire others in their own crafting. Consider writing a brief description that explains your process or the story behind your choices. This adds a personal touch that resonates deeply with viewers. You might also want to share any tips you’ve learned along the way. Remember, every completed project is a stepping stone in your artistic evolution. So, get those cameras ready and let your craftsmanship shine!
Popular Embroidery Techniques to Try
Embroidery one of the most satisfying and versatile crafts you can explore. Here are some techniques that I’m absolutely passionate about. Each one can breathe new life into your projects and ignite your creativity.
- Cross-Stitch: This is a classic way to create detailed designs using just a needle and thread. The simple X-stitches build intricate patterns that are perfect for beginners.
- Sashiko: Originating from Japan, Sashiko involves simple running stitches to create beautiful geometric patterns. I love how this technique emphasizes both utility and aesthetics.
- Free Motion Embroidery: This method allows for drawing with the sewing machine. It’s thrilling to create designs that flow naturally, giving your work a unique personal touch.
- Appliqué: This involves stitching one piece of fabric onto another. Whether you choose raw edge or needle-turn appliqué, it’s a delightful way to add texture and color.
- Blackwork: A traditional English technique, it uses black thread on a light background. Its striking contrast creates stunning designs, often inspired by historical patterns.
- Fiber Art: Experimenting with unconventional materials can yield fantastic results. I regularly use fibers and threads in unexpected ways to create truly one-of-a-kind pieces.
Price Ranges and Where to Buy
Exploring the various price ranges for arts and crafts supplies and the best places to shop for them.
- Budget-Friendly Finds: For those of us who love crafting without breaking the bank, stores like Dollar Tree and Walmart offer supplies for as low as $1.
- Mid-Range Staples: If you’re willing to invest a bit more, Michaels and Joann Fabrics carry a great selection, with items typically ranging from $5 to $25.
- Premium Products: For serious crafters, high-quality brands at specialty stores or websites like Blick Art Materials can range from $30 to $100, ensuring durability and vibrant results.
- Online Shopping: Websites like Amazon often have various options with competitive prices. It’s easy to find materials you need at every price point, sometimes with free shipping for members.
- Local Art Supply Stores: Don’t overlook local shops! They often carry unique products and can offer insider tips if you’re lucky to strike up a conversation.
Essential Tools and Materials for Embroidery
To dive into embroidery, you need the right tools and materials. First off, a quality embroidery hoop is essential; it keeps your fabric taut and prevents sagging. I can’t stress enough the importance of good embroidery needles—choose ones appropriate for your thread and fabric type. Thread selection can elevate your work. Opt for high-quality threads; they’re smoother, stronger, and give better results. A variety of colors is a must for creativity. Don’t forget fabric! Cotton and linen are fantastic choices, providing the ideal canvas for your designs. Scissors that are sharp and precise are crucial, too. They make cutting threads easier and neater. Lastly, invest in a seam ripper for any mistakes. With these essential tools and materials, you’re all set to create stunning embroidery pieces.
List of Recommended Tools for Beginners
To kickstart your creative adventures in arts and crafts, I’ve compiled a solid list of tools that every beginner should seriously consider. These tools not only make the process easier but also enhance your overall experience. Let’s jump right into it!
- 1. Scissors: A good pair of scissors is essential. You’ll need them for paper crafts, fabric, and a plethora of projects. Look for ones that feel comfortable in your hand.
- 2. Glue Stick: Not all glues are created equal. A quality glue stick offers precision and prevents messiness, which is perfect for card-making and scrapbooking.
- 3. Acrylic Paints: Bright, vibrant, and easy to use, acrylic paints are fantastic for both beginners and seasoned creators alike. They dry quickly and are perfect for various surfaces.
- 4. Paintbrush Set: Invest in a decent set of paintbrushes. Different shapes and sizes will allow you to experiment with techniques and styles.
- 5. Yarn and Knitting Needles: If you’re interested in knitting, choose a soft yarn and a standard needle size to make your first projects enjoyable.
- 6. Craft Knife: A craft knife is indispensable for precision cutting. It’s especially useful in detailed paper crafts and model-making.
- 7. Sketchbook: Always have a sketchbook handy. It’s a great space to brainstorm ideas, sketch designs, and practice techniques before committing.
Troubleshooting Common Embroidery Issues
Embroidery can be incredibly rewarding, but it’s not without its challenges. One of the most common issues I encounter is thread breakage. This can stem from using the wrong type of thread, incorrect tension settings, or even a dull needle. Experimenting with these variables often resolves the issue quite effectively. If your embroidery design isn’t stitching out correctly, check your hooping technique. A poorly hooped fabric can lead to misaligned stitches, ruining your entire design. Ensuring all layers are tight but not overly stretched is crucial.
Another frequent problem is puckering, which can occur if your fabric isn’t compatible with embroidery. Choose the right stabilizer and consider the weight of your fabric for the best results. Don’t underestimate the importance of test stitching! Always run a sample on scrap fabric to fine-tune your settings before tackling your main project. Remember, these troubleshooting tips can save you from frustrations and enhance your embroidery experience.
Step-by-Step Guide to Assembling Your Kit
Assembling your kit is an essential first step toward unleashing your creativity. Gather all necessary materials before you start. Create a checklist of items, ensuring you don’t overlook anything crucial. Having everything on hand will keep your flow uninterrupted. Next, organize your space. A cluttered environment can stifle creativity, so make sure you have a clean, dedicated area to work in. Having a well-arranged workspace not only boosts focus but also enhances your artistic experience. Begin by categorizing your supplies: tools, materials, and embellishments should have their designated spots. This avoids fumbling mid-project. Lastly, don’t forget to include a few inspirational items. These can be photos, quotes, or previous works that elevate your motivation as you create. Following these steps ensures you’re fully equipped and ready to explore your artistic endeavors!
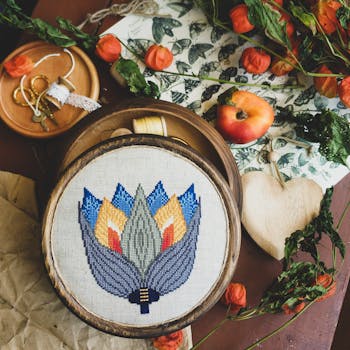
Choosing the Right Embroidery Stocking Kit
Selecting the ideal embroidery stocking kit can be a thrilling yet daunting task. I’ve been there, staring at a myriad of options, unsure of what best suits my skill level and project goals. First, consider your experience; are you a beginner or more advanced? This greatly influences which kits will be accessible and enjoyable for you. Look for kits with clear instructions and quality materials to ensure a satisfying crafting experience. Secondly, think about the design. What excites you? A classic motif or a trendy design? Always choose something that resonates with your personality. Lastly, check reviews or get recommendations from friends or online communities. They often provide insights that can save you time and frustration. Remember, this is a fun and creative endeavor, so pick a kit that inspires you and let your artistry shine!
Tips for Successful Embroidery Techniques
Choose the right needle and thread. Each fabric and design requires specific types to achieve the best results. Imagine using a thick thread on delicate silk—disastrous! Practice your stitches. Mastering basic stitches like backstitch and satin stitch before moving on to complex patterns can save you countless headaches. I often sketch my designs beforehand, allowing me to visualize and refine my ideas. Use the right hoop. A snug fit keeps the fabric taut, preventing any unwanted puckering. Don’t underestimate the importance of tension; threading the needle correctly leads to fewer snags and smoother stitching. Lastly, keep your workspace organized. A clutter-free area enhances focus and creativity, so try to keep threads, needles, and fabrics neatly arranged. With these tips, you’ll see your embroidery skills flourish like never before!
Benefits of Using a Stocking Kit
Stocking kits offer a delightful mix of convenience, creativity, and joy for crafters of all levels.
- Perfect for Beginners: A stocking kit offers comprehensive instructions, making it easy for those new to crafting to follow along.
- All-Inclusive Packages: You receive everything needed—fabrics, threads, and embellishments—eliminating the hassle of sourcing materials yourself.
- Endless Customization: While kits provide a foundation, you can add unique touches, like personal monograms or special decorations, allowing your creativity to shine.
- Family Bonding: Crafting stockings together creates lasting memories with loved ones, making it a joyful festive activity.
- Instant Gratification: Completing a stocking provides a quick sense of accomplishment, perfect for those who love seeing immediate results.
- Holiday Tradition: Using a stocking kit can spark a new ritual, encouraging you to craft year after year to keep the festive spirit alive.
Participating in the Embroidery Community
Joining the embroidery community has been one of the most enriching experiences for me as a craft enthusiast. It’s not just about stitching patterns; it’s about connecting with like-minded individuals who share a passion for fabric and thread. The sense of camaraderie and support within this community is palpable. I’ve discovered that sharing ideas, techniques, and even mistakes can lead to incredible learning opportunities. Participating in local groups and online forums has allowed me to gain new perspectives and skill sets that I never would have achieved alone. Whether you’re a novice or an experienced stitcher, you will find invaluable resources and friendships waiting for you. From collaborative projects to workshops, the possibilities are endless. Don’t hesitate to reach out, participate in discussions, and showcase your work. Embrace the community and watch your creativity flourish!
As an Amazon Services LLC Associates Program participant, we earn advertising fees by linking to Amazon, at no extra cost to you.
What is included in an embroidery stocking kit?
An embroidery stocking kit typically includes everything you need to create a festive stocking. You’ll find pre-printed fabric with the design, embroidery floss in various colors, needles, and a clear instruction booklet. Some kits even come with embellishments like buttons or sequins to add that extra sparkle. This makes it perfect for beginners and experienced crafters alike. I love how these kits allow me to focus on the creative process without the hassle of gathering materials. It truly simplifies the crafting experience and brings joy as you see your project come to life!
How long does it typically take to complete an embroidery stocking?
Completing an embroidery stocking usually takes me anywhere from 10 to 20 hours. This largely depends on the complexity of the design and my skill level. For intricate patterns or larger stockings, I might find myself investing even more time. It’s really essential to pace yourself and enjoy the process. I’ve learned that rushing through it often leads to mistakes, which can be frustrating. On the other hand, simpler designs can sometimes be finished in just a few hours. Overall, have fun and let the creativity flow as you stitch!
Can I personalize my stocking with different designs?
Absolutely, personalizing your stocking is a fantastic way to express your creativity! You can choose from a variety of designs like traditional patterns, modern motifs, or even seasonal themes to make your stocking unique. Using fabric paint, embroidery, or even appliqué techniques allows you to add names, images, or meaningful symbols. The best part? There are no limits to what you can create! Feel free to mix and match colors, styles, and elements that resonate with your personality. If you’re feeling adventurous, why not involve the whole family in a decorating session? Personalization adds that special touch to your holiday decor.
What if I am new to embroidery—are these kits beginner-friendly?
Absolutely! These kits are designed with beginners in mind. Each kit includes easy-to-follow instructions and all the materials you need to get started right away. You won’t feel lost, even if it’s your first time picking up a needle and thread. I found that having clear guidance makes a world of difference. Plus, the joy of creating something beautiful from scratch is simply unmatched. If you have a bit of patience and a willingness to learn, you’ll be stitching like a pro in no time!
Are there any age restrictions for using embroidery kits?
Embroidery kits are incredibly accessible and can be enjoyed by all ages. From children to adults, the design and complexity vary, making them suitable for beginners and experienced crafters alike. Young kids can start with simple kits that include larger needles and thicker threads, while more intricate designs appeal to older teens and adults. That said, it’s wise for parents to supervise younger children to ensure safety and provide guidance. Ultimately, this creative outlet invites everyone to express their artistic flair, regardless of age.
Where can I find online resources for additional guidance?
If you’re looking for inspiration and guidance, there are plenty of online resources to explore. Websites like Pinterest and Instagram are bursting with creative ideas that will spark your imagination. YouTube is another goldmine for tutorials, offering everything from painting techniques to intricate knitting patterns. Join online forums or communities, where fellow enthusiasts share tips and projects. Don’t forget to check out craft-specific blogs, including ours, for unique DIY ideas and step-by-step instructions. These resources will help you sharpen your skills and keep your creativity flowing!
How do I maintain my embroidery for longevity?
To keep your embroidery looking fresh for years, handle it with care. Always wash your embroidered items by hand in cold water using a gentle detergent. Avoid wringing or twisting, as it can distort the stitches. Lay it flat to dry, steering clear of direct sunlight to prevent fading. If you need to iron, do it on the reverse side with a low setting. Proper storage is key; keep it in a cool, dry place. Remember, love and care go a long way in preserving your art!
**Embroidery kits are essential for beginners and seasoned crafters alike.** They simplify the crafting process by providing everything you need in one package. The clear instructions and pre-selected materials take away the guesswork, allowing you to focus on creativity and enjoyment.
Using the right tools can completely transform your embroidery projects. I’ve experienced the frustration of struggling with inadequate supplies. A good machine and quality threads make all the difference!
Customization transforms your stocking into a cherished keepsake. Personal touches reflect your unique style and values, making every festive moment more special. I truly believe that a customized stocking carries deeper sentimental value, creating lasting memories.
Connecting with fellow crafters is essential. Each interaction opens up new perspectives and ideas that can ignite your creativity. Don’t underestimate the power of community in your artistic journey!


