As an Amazon Services LLC Associates Program participant, we earn advertising fees by linking to Amazon, at no extra cost to you.
Step-by-step guide to creating a serger seam
Are you ready to master the art of creating a serger seam? Follow my detailed step-by-step guide to help you achieve professional-looking results with your sewing projects.
- Prepare your fabric and thread, making sure your serger is set up and ready to go.
- Adjust the settings on your serger according to the type of fabric you are using. Proper tension is key to a flawless serger seam!
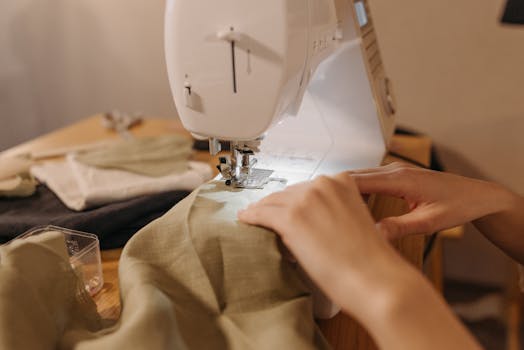
- Line up the edges of your fabric and feed them through the serger, keeping a steady hand as you guide the fabric.
- Once you have stitched your serger seam, press it with an iron to set the stitches and smooth out any wrinkles.
- Trim any excess fabric or threads, and voila! You now have a perfectly finished serger seam to showcase on your latest sewing project.
Essential Serger Seam Techniques
Discover key serger sewing techniques to enhance your projects and improve the durability and finish of your seams.
- 1. Overlock Stitch: Learn how to create a basic overlock stitch for neatly finishing raw edges and preventing fraying.
- 2. Rolled Hem: Master the technique of sewing a rolled hem for a professional and polished look on lightweight fabrics.
- 3. Flatlock Seam: Explore how to sew a flatlock seam that is ideal for joining fabrics with minimal bulk and a decorative finish.
- 4. Coverstitch: Discover the versatility of a coverstitch for creating professional-looking hems, seams, and decorative trims.
- 5. Differential Feed: Understand how to adjust the differential feed on your serger to prevent stretching or puckering while sewing different types of fabrics.
- 6. Thread Tension: Fine-tune the thread tension on your serger to achieve balanced and even stitches on various fabric weights.
- 7. Seam Finishes: Experiment with different serger seam finishes such as overcasting, flatlocking, and rolled hems to enhance the durability and aesthetics of your projects.
Finishing Techniques for Serger Seams
As a crafting enthusiast, I cannot stress enough the importance of perfecting your finishing techniques for serger seams. Whether you’re a beginner or a seasoned crafter, the way you finish your seams can make a world of difference in the final look and durability of your projects. Investing time in mastering these techniques will elevate your sewing game and take your creations to the next level. From preventing fraying to ensuring a professional finish, serger seams play a crucial role in the overall quality of your handmade items.
Join me on this journey as we explore different methods and tricks to achieve flawless serger seams. I’ll share insider tips and step-by-step guides to help you navigate the world of finishing techniques with confidence. Get ready to unleash your creativity and elevate your sewing skills with these invaluable tips. Stay tuned for more in-depth tutorials and inspiration to fuel your crafting endeavors!
Ideas for incorporating serger seams in different projects
As a passionate crafter, I have found serger seams to be a game-changer in my creative projects. Here are a few ideas that will help you elevate your craft with serger seams:
- Utilize serger seams to create clean and professional finishes on garments such as dresses, tops, or skirts.
- Experiment with decorative serger threads to add a pop of color or texture to your sewing projects.
- Combine different fabrics in one project by using serger seams to join them seamlessly.
- Try incorporating serger seams in quilting projects for a modern and polished look.
- Enhance the durability of your handmade bags and accessories by using serger seams to reinforce the seams.
- Use serger seams to hem and finish raw edges for a neat and tidy appearance on home decor items like curtains, table linens, or pillow covers.
Serger Seam vs. Regular Seam: A Comparison
Serger seam and regular seam are two common types of seams used in sewing projects. As a crafting enthusiast, I have come to appreciate the unique qualities of each type of seam and how they can impact the overall look and durability of a project. The serger seam, also known as an overlock seam, is created using a serger machine that trims the fabric edges and encases them in thread to prevent fraying. This type of seam is ideal for stretchy fabrics and creates a professional finish. On the other hand, the regular seam, made with a sewing machine, is more straightforward and suitable for woven fabrics. While it may not have the same clean edge as a serger seam, it is versatile and can be strengthened with additional finishing techniques.
Tips for Achieving Perfect Serger Seams
Are you tired of struggling with your serger seams and never quite achieving that professional finish you desire? Well, fear not because I’m here to share some valuable tips that will take your sewing projects to the next level!
First and foremost, always test your settings and tensions on scrap fabric before starting on your actual project. This simple step can save you from a lot of frustration and wasted time.
Additionally, make sure your cutting blade is sharp to ensure clean and precise cuts. A dull blade can lead to messy seams that are difficult to work with.
Lastly, practice, practice, practice! The more you sew with your serger, the more comfortable you will become with it, leading to those perfect seams you’ve always dreamed of.
Common Mistakes to Avoid when Using a Serger Seam
Using a serger seam can elevate your sewing projects to a whole new level of professional quality. However, there are common mistakes that can easily undo all your hard work and leave you frustrated.
One major mistake is not properly threading your serger. This may seem like a small detail, but it can make a huge difference in the final outcome of your seam. Another mistake is using the wrong type or weight of thread, which can affect the durability and appearance of your seam.
Additionally, rushing through the process without properly aligning your fabric layers can result in uneven seams or skipped stitches.
It’s crucial to take your time and pay attention to detail when using a serger. By avoiding these common mistakes, you can ensure that your sewing projects turn out beautifully every time.
Top serger machines for beginners
Looking to start your serging journey? Here are my top recommendations for serger machines perfect for beginners!
- Brother 1034D Serger: This user-friendly serger is perfect for beginners with its easy threading system and adjustable stitch width.
- Janome 8002D Serger: A reliable choice for beginners, this serger offers a variety of stitch options and a built-in thread cutter for added convenience.
- Singer ProFinish Serger: With its easy to follow color-coded lay-in threading system, this serger is a great option for beginners looking for a hassle-free experience.
- Juki MO654DE Serger: This compact serger is perfect for beginners with its adjustable differential feed and easy-to-read tension dials.
- Bernette B44 Overlocker: Ideal for beginners, this serger offers quick and easy threading, making it a great option for those new to serging.
Mar 6, 2018 … While a 2-thread sew will give your fabric edge a basic seam (straight stitch), 3- and 4-thread serger models create tighter overlocking seams.
Jul 23, 2023 … Demystify serging accurate seam allowances on your serger. We will demonstrate a variety of stitches and seam allowances in this Tip Clip.
Page 1. GRADES 6 & UP ONLY! Sewing With Sergers. A serger or overlock … 4 thread called a true 4 thread, all 4 threads are necessary to sew a serged seam.
Mar 12, 2019 … … page: https://www.facebook.com/BrotherSews … Serger Seam Allowance on Overlockers – | Abi's Den ✂️ . Abi's Sewing Den•22K views · 8:40.
Aug 15, 2014 … Like everything, I'm sure there is more than one way to unpick a serged seam, but this is my favourite. … This site uses Akismet to reduce spam.
Aug 12, 2023 … We had so many questions to the Seam Allowance video (link below) I decided to do a follow up. Watch this Tip Clip and see two examples of …
Benefits of Using a Serger Seam
Hey there, fellow crafters! Today, I want to share with you the benefits of using a serger seam in your sewing projects. As someone who loves to create beautiful garments and crafts, I can confidently say that a serger seam is a game-changer in the world of sewing. Not only does it provide a clean and professional finish, but it also helps to prevent fraying and unraveling of fabric edges. Using a serger seam can save you time and effort, allowing you to focus on honing your creative skills and bringing your artistic vision to life. Whether you’re a beginner or a seasoned pro, incorporating a serger seam into your projects can take your creations to the next level. So why wait? Give it a try and experience the difference for yourself!
Materials needed for serger seam
When it comes to creating a perfect serger seam, having the right materials is key. Here are the essential items you’ll need to achieve professional-looking results:
- Serger Machine: The first and most important item on your list is a quality serger machine. This specialized sewing machine is designed to create strong, neat seams quickly and efficiently.
- Serger Thread: Using the right thread is crucial for achieving durable and professional-looking seams. Make sure to have a selection of high-quality serger threads in various colors on hand.
- Fabric: Choose the appropriate fabric for your project, whether it’s lightweight cotton for garments or heavy-duty denim for home decor. Having a variety of fabrics in your stash will allow you to tackle a wide range of projects.
- Scissors: Sharp scissors are a must-have for cutting fabric and thread cleanly. Invest in a pair of fabric scissors specifically for your serger projects to ensure precise cuts every time.
- Pins or Clips: Securing your fabric layers together before serging is essential to prevent shifting. Use pins or clips to hold your fabric in place and keep your seams uniform.
- Seam Ripper: Mistakes happen, so having a seam ripper on hand is essential for undoing stitches and correcting errors. Choose a quality seam ripper that is comfortable to hold and easy to maneuver.
- Manual and Tools: Familiarize yourself with your serger machine’s manual and tools to ensure smooth operation. Keep your machine well-maintained by following the manufacturer’s instructions for cleaning and oiling.
- Practice Fabric: Before tackling a project, practice serging on scrap fabric to test tension settings and stitch lengths. This will help you gain confidence and perfect your technique before working on your final piece.
What is a Serger Seam?
A serger seam is a type of stitch that is created by a serger machine, also known as an overlocker. It is a seam finishing technique that trims the seam allowance while simultaneously sewing it, creating a clean and professional-looking edge. Serger seams are commonly used in garment construction to prevent fraying and provide a neat finished look. Unlike a traditional straight stitch, a serger seam has multiple threads that wrap around the edge of the fabric, securing it in place.
Can I use a serger on all types of fabrics?
Absolutely not. Using a serger on all types of fabrics can result in damaged material and messy stitches. Each fabric requires specific settings and techniques to achieve the best results. Before using your serger, always test on a scrap piece of fabric to ensure the stitch quality is suitable. Different fabrics may require adjustments to tension, stitch length, and differential feed. To avoid frustration and potential fabric wastage, take the time to understand the capabilities of your serger and the fabric you are working with.
Is it worth investing in a serger machine for my sewing projects?
Yes, investing in a serger machine for your sewing projects is absolutely worth it. Not only does a serger create professional-looking finishes on your garments, but it also saves you time and frustration compared to using a regular sewing machine. The efficiency and versatility of a serger can elevate your sewing projects to the next level, making them look more polished and durable. While it may seem like an additional expense at first, the benefits of owning a serger far outweigh the initial investment.
How do I troubleshoot common serger seam issues?
Troubleshooting serger seam issues can be frustrating, but with a few tips, you can tackle them head-on. First, check your thread tension – uneven tension can result in messy seams. Make sure your needles are properly inserted and not damaged. Additionally, clean and oil your serger regularly to prevent fabric jams. Lastly, experiment with different stitch lengths and widths to find the right settings for your project. By following these steps, you’ll be able to resolve common serger seam issues with ease.
Can I create decorative serger seams in addition to functional ones?
Yes, absolutely! In the world of arts and crafts, the possibilities are endless. Adding decorative serger seams to your projects can take them to the next level, adding a touch of creativity and uniqueness. While functional seams are important for durability and structure, don’t be afraid to experiment with decorative stitches to make your creations truly stand out. Whether you’re working on a sewing project or adding a special touch to a piece of clothing, decorative serger seams can elevate your work and showcase your artistic flair.
Do I need special needles or thread for serger stitching?
No, you don’t necessarily need special needles or thread for serger stitching. However, using serger needles and serger thread can optimize your results. Regular needles and thread might work, but they may not produce the same professional finish. It’s all about the quality and durability of the final product. Investing in specialized tools can elevate your sewing projects to the next level.
What are some common serger seam finishing techniques?
When it comes to serger seam finishing techniques, my go-to methods include:1. Overlock stitch: This classic serger technique trims the fabric edge while simultaneously finishing it with a neat, clean edge. 2. Rolled hem: Perfect for lightweight fabrics, this technique creates a delicate, professional-looking finish. 3. Flatlock stitch: Ideal for joining seams in a decorative or functional manner, giving a unique, textured look. 4. Picot stitch: Adds a decorative edge to your projects, perfect for adding a touch of flair. Give these techniques a try and elevate your sewing projects to the next level!
Serger seams provide a professional finish to your sewing projects by creating clean and durable edges that give a polished look to your creations.
**Using a serger can save time on finishing seams**. I find that incorporating a serger into my arts and crafts projects not only speeds up the process but also gives a professional finish to my work. It’s a game-changer for efficiency in my creative endeavors.
Experiment with various stitch options on your serger to achieve unique looks that elevate your crafting projects. Get creative and discover new possibilities by trying out different techniques!
Practice and patience, essential for mastering serger seam techniques, require dedication and time to perfect. Embrace the process to unleash your creativity fully.
Look for tutorials and classes to enhance your serger sewing skills. Learning from experts can elevate your crafting abilities and spark new creative ideas.
Serger seams are essential for working with knit fabrics and stretchy materials. They provide durability and flexibility that regular seams can’t match, making them a must-have for any sewing project involving these materials.
Experimenting with thread colors can elevate your arts and crafts projects to a whole new level of creativity. Don’t be afraid to mix and match different hues to spark your imagination!
As an Amazon Services LLC Associates Program participant, we earn advertising fees by linking to Amazon, at no extra cost to you.


