


As an Amazon Services LLC Associates Program participant, we earn advertising fees by linking to Amazon, at no extra cost to you.
Ideas for Personalizing Your Stocking
Creative ideas to make your holiday stockings truly unique and special.
- Use Fabric Paints to Create Custom Designs: I love the freedom of fabric paints. Sketch or stencil a unique design that reflects your personality or a loved one’s interests.
- Incorporate Personal Photos: Nothing warms my heart like adding family photos to stockings. You can transfer images onto fabric or create small photo pockets.
- Add Initials or Names: Embroider or sew names and initials onto the stocking’s cuff for a personal touch. It makes each stocking feel special and distinct in a crowded space.
- Choose Unique Fabrics or Textures: Go beyond basic felt. Use burlap, velvet, or even upcycled materials to give your stocking a unique flair and personality.
- Decorate with Themed Ornaments: Attach tiny ornaments that resonate with the recipient’s hobbies or passions, whether it’s a miniature guitar for a music lover or a paint palette for an artist.
- Incorporate Nature-Inspired Embellishments: Using dried flowers, twigs, or pinecones adds an earthy touch. They evoke a sense of rustic charm and can be easily glued or sewn on.
Gift Ideas: Customized Stockings for Loved Ones
Customized stockings are a delightful way to show your loved ones just how much you care. You can easily create unique designs that reflect their personalities, interests, and style. Whether it’s a festive yarn you knitted by hand or an embellished store-bought version, every detail counts. Consider incorporating their favorite colors, names, or even images that represent cherished memories.
Don’t shy away from using various materials! Felt, glitter, and embroidery can elevate the simple stocking into a stunning keepsake. The act of personalizing adds a heartfelt touch that store-bought options lack. Think about including small pockets for surprise goodies or attaching meaningful charms.
For those feeling crafty, a DIY approach allows for creativity to flourish. With endless possibilities, customized stockings can become cherished holiday traditions. This gift idea combines the joy of crafting with the warmth of personalized sentiment.
Common Mistakes and How to Avoid Them
One of the biggest mistakes I see is rushing through projects without reading instructions fully. Take the time to understand each step; this can save you from costly errors. Another common pitfall is ignoring the quality of materials. Investing in good supplies can significantly affect your final artwork. Don’t skimp on paint, brushes, or fabrics if you want your project to shine. Inadequate workspace is also a frequent issue. Ensure you have a clean, organized area to work; clutter can lead to mistakes. Forgetting to take breaks is another mistake I often make. Creativity can diminish if you don’t give your mind a rest. Finally, sharing your work with others too soon can be detrimental. Wait until you’re truly satisfied with your piece before seeking feedback. This ensures that the critique comes at a time when you feel confident in your artistic choices.
Benefits of Crafting with an Embroidery Kit
Exploring the joys and advantages of embroidery through dedicated kits.
- Convenient and All-Inclusive: An embroidery kit typically includes all the essentials like fabric, thread, needles, and even patterns. This means I can start crafting without searching for each item separately.
- Skill Development: Working with an embroidery kit helps me sharpen my fine motor skills and attention to detail. Each stitch I make enhances my coordination and boosts confidence in my abilities.
- Creative Expression: I love how these kits offer countless design options, allowing me to express my style. Whether it’s a floral pattern or a personalized monogram, the possibilities are endless.
- Relaxation and Mindfulness: Embroidery allows me to unwind and clear my mind. Focusing on the repetitive motions of stitching can be incredibly meditative, enhancing my overall well-being.
- Perfect for All Ages: An embroidery kit can be enjoyed by everyone, from children to adults. It’s a delightful way to bond with family members while nurturing creativity.
How to Care for Your Finished Embroidery
Handling your finished embroidery with care is essential to preserve its beauty and longevity. Always wash your hands before touching to prevent oils and dirt from transferring to the fabric. If your piece has been stained, gently dab the area with a damp cloth and mild soap, avoiding any scrubbing that might damage the stitches. Storing your embroidery properly is crucial. Place it in a cool, dry place, away from direct sunlight to avoid fading. Use acid-free tissue paper to wrap your work, which helps prevent creasing and keeps it protected. When displaying, choose a frame that provides UV protection. This will shield your embroidery from sunlight and keep colors vibrant. If hung on a wall, ensure it’s in a location that doesn’t experience temperature fluctuations or high humidity. Lastly, if you’re transporting your embroidery, roll it, rather than folding it, to avoid creases or damage.
Trying to find the Bucilla stocking with the dancing ballerina bears no luck so far. … Started this 6” Hoop ᗩᗩᗩIᗩᗩᗩ Stamped Embroidery Kit today. It's called …
MerryStockings is the best source online for Bucilla felt Christmas crafts, get yours today and join our MerryRewards page to save $ on future orders.
Bucilla Felt Christmas Stocking Kits, DIY Christmas crafts …
Dec 4, 2022 … Switch to the basic mobile site. This browser is not supported … Kit – The Glass Slipper Stocking · May be an image of Christmas stocking.
Official Bucilla Group | Looking for the list of Bucilla kits by year and …
Made exclusively for Colonial Williamsburg, the Stocking Ornament Embroidery Kit features symbols of the Historic Area during the holiday season.
Colonial Williamsburg Stocking Ornament Embroidery Kit – Holiday …
Check out our christmas stocking kits selection for the very best in unique or custom, handmade pieces from our stockings shops.
Creative Techniques for Enhancing Your Stocking
Personalizing your stocking is a fantastic way to showcase your creativity. I love incorporating unique fabrics such as felt or burlap, which add texture and visual interest. Appliqué designs can transform an ordinary stocking into a statement piece; I often cut out shapes and stitch them on for a playful touch. Adding embellishments like buttons, ribbons, or sequins provides dimension while also making it fun to reflect on seasons past. For a rustic charm, consider using natural materials like twine or pinecones. I really enjoy creating a nature-inspired stocking by attaching small branches or dried flowers. Another exciting technique is to use fabric paint or markers to draw or write holiday wishes. This method allows for complete freedom in design and personalization. Don’t forget to incorporate your favorite colors and patterns to make the stocking truly yours. Each embellishment tells a story and gives character to the stocking, reflecting your unique style.
Choosing the Right Stocking Embroidery Kit
Selecting the ideal stocking embroidery kit can make or break your crafting experience. I always start by considering the design options available; vibrant patterns excite me, while classic motifs bring a nostalgic charm. Quality of materials is non-negotiable. I avoid kits with cheap threads or flimsy fabrics that won’t withstand the test of time. Check the skill level of the kit. I prefer kits marked for my skill level to avoid frustration. If I’m feeling adventurous, I go for intermediate kits that offer a bit of a challenge but aren’t overly complicated. Look for comprehensive instructions; I find detailed guides and clear diagrams essential, especially for intricate designs. Finally, consider the price. A higher cost often correlates with better quality, but I also keep an eye out for sales and promotions to snag a great deal. Choosing wisely can lead to a rewarding and enjoyable crafting project!
Tips for Selecting the Perfect Thread Colors
Choosing the right thread colors can enhance your project significantly.
- Consider the project theme: Choose colors that align with the overall mood and theme you want to express. Bright colors for cheerful pieces or muted tones for a more sophisticated look can make a big difference.
- Use a color wheel: A color wheel is invaluable. It helps you visualize complementary and contrasting colors, making it easier to select harmonious combinations.
- Look at the materials: The texture and sheen of different threads can affect color perception. Always consider how the thread will look on the fabric.
- Follow your instincts: Trust your gut feeling. If a color combination speaks to you, experiment with it. Sometimes the best results come from unexpected choices.
- Test swatches: Always test your thread choices on a small piece of your fabric. This practice helps ensure the colors look as good in practice as they do in your mind.
- Consider the season: Seasonal inspirations can provide guidance. Warm, vibrant colors for summer projects and cool, muted shades for winter can evoke the right seasonal feelings.
Top Recommendations for Beginner Kits
These beginner kits come highly recommended for anyone eager to dive into arts and crafts.
- Acrylic Painting Starter Kit: This kit provides all the essentials—paints, brushes, and canvases. It’s perfect for exploring various techniques, from blending colors to layering.
- Knitting Basics Bundle: Featuring a selection of yarn, a set of beginner-friendly needles, and instructional patterns, this kit makes learning to knit enjoyable and accessible.
- Paper Crafting Set: Contains high-quality paper, scissors, and glue, along with templates for creating cards and decorations. It’s a fantastic introduction to the world of paper arts.
- Embroidery Starter Kit: With threads, needles, and a hoop, this kit includes a guide for simple stitches, perfect for creating beautiful hand-stitched designs.
- DIY Candle Making Kit: Complete with wax, wicks, and scents, this kit is ideal for beginners wanting to craft personalized candles at home.
- Resin Art Kit: This intriguing kit includes resin, molds, and tools, making it easy to create stunning coasters or jewelry pieces while learning the basics of resin crafting.
- Watercolor Painting Set: Featuring essential paints, brushes, and watercolor paper, this kit invites beginners to explore the delicate art of watercolor without feeling daunted.
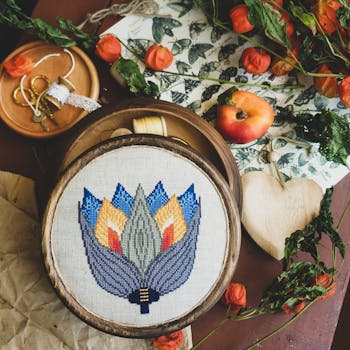
Step-by-Step Guide to Stocking Embroidery
Embroidery supplies are essential for every stitcher. First, gather your materials: embroidery floss, needles, fabric, and hoops are non-negotiable basics. I recommend choosing 100% cotton fabric for best results. It’s durable and easy to work with. Next, select your embroidery floss; DMC and Anchor are my top picks for vibrant colors and quality. It’s time to choose a needle. A size 7-9 embroidery needle is ideal for most fabrics, but adjust based on your specific project.
Organizing your threads is crucial. Use bobbins or a thread box to prevent tangles. I often label my threads for quick access. Now, prepare your fabric by stitching on an embroidery hoop to keep it taut; this simplifies the process immensely. Lastly, experiment with stitches. Whether you’re into backstitch, satin stitch, or French knots, practice on scrap fabric before tackling your masterpiece!
Materials Needed for Stocking Embroidery
To tackle stocking embroidery, I rely on a few essential materials that make the process enjoyable and efficient. Here’s what I consider indispensable.
- Embroidered Stocking Blank: This is my canvas! I choose a quality, pre-made stocking for the best results.
- Embroidery Floss: A vibrant selection of colors breathes life into my designs. I’m a fan of quality brands that don’t tangle easily.
- Embroidery Needles: I prefer needles with a larger eye for threading multiple strands of floss. A pack with assorted sizes suits various projects.
- Scissors: Sharp, precision scissors are crucial for clean cuts. My go-tos are small and sharp for detailed work.
- Embroidery Hoop: Keeping my fabric taut makes stitching a breeze. An adjustable hoop helps me keep everything neat.
- Fabric Stabilizer: This helps prevent stretching while I work, ensuring my designs stay crisp and clean.
- Tracing Paper or Pencil: I often trace my designs onto the stocking before stitching. A pencil is essential for marking fabric.
- Adhesive Spray (optional): Some projects call for this to temporarily hold layers in place, although I use it sparingly.
Participating in Online Embroidery Communities
Joining online embroidery communities has transformed my crafting experience tremendously. These platforms offer not only a space to share my work but also a rich tapestry of ideas and inspirations from fellow enthusiasts. From lively forums to dedicated Facebook groups and Instagram hashtags, I found endless opportunities to connect with others who share my passion.
Engaging in discussions about techniques, supplies, and project ideas has opened my eyes to new possibilities. I often find myself inspired by the creativity of others, whether it’s through intricate designs or unique stitching methods. Participating in these communities has also allowed me to ask questions and receive personalized feedback, which is invaluable for improving my skills.
Additionally, the sense of camaraderie within these groups is enlightening. Sharing progress on projects and celebrating others’ milestones creates a positive environment that fuels my enthusiasm for embroidery. It’s amazing how a simple online thread can spark so much creativity!
Essential Tools for Your Embroidery Kit
A well-rounded embroidery kit is incomplete without a few key tools. First on the list is a quality set of embroidery needles; different sizes accommodate various fabric types and thread thicknesses. Make sure to invest in an assortment. Next, a reliable pair of embroidery scissors is crucial. These should be sharp and small enough for precise cuts. Additionally, having a variety of threads is vital—opt for both cotton and polyester to cover all your bases. Don’t overlook embroidery hoops. They maintain fabric tension, preventing puckering and making stitching easier. A good fabric marking tool, like a water-soluble pen, helps with designs, allowing for easy removal post-stitching. I recommend adding a seam ripper; it’s a lifesaver for correcting mistakes. Lastly, keep a few needles of various types on hand, like tapestry or ballpoint, to address specific projects. Building your kit around these tools will set you up for success in your embroidery endeavors!
Inspiration: Unique Stocking Designs
Unique stocking designs can truly elevate your holiday decor. I find that each stocking tells a story, whether it’s a personalized monogrammed piece or an intricate knitted pattern. One of my favorite ideas is using reclaimed materials, like vintage fabrics, to create a rustic, eclectic look. Embellishments like bells, pom-poms, or even LED lights can add an extra layer of charm. Experimenting with different shapes, such as elongated or extra-wide stockings, can present a fresh take. Knitted or crocheted designs allow for endless creativity; choose a seasonal color palette or playful motifs. Another fantastic option is to incorporate community art by hosting a stockings exchange with neighbors or friends, where everyone brings their own unique creation.
Ultimately, each design is an opportunity to express individual flair and creativity. Whether you prefer classic elegance or bohemian whimsy, the right stocking can become a cherished part of your festive traditions.
As an Amazon Services LLC Associates Program participant, we earn advertising fees by linking to Amazon, at no extra cost to you.
What is included in a typical stocking embroidery kit?
A typical stocking embroidery kit offers a curated selection of essential items that make the crafting process enjoyable and straightforward. You’ll generally find pre-printed fabric featuring the design, ensuring your pattern is set for easy stitching. Most kits include a range of embroidery floss in vibrant colors, along with needles suited for the fabric type. A set of clear instructions is crucial, guiding you through each step of the process. Additionally, some kits may come with embellishments like sequins or beads to add a unique flair. Don’t expect fancy extras; the best kits focus on quality materials that help you create a lasting piece.
How long does it take to complete a stocking embroidery project?
Completing a stocking embroidery project can take anywhere from a few hours to several days, depending on various factors. The complexity of the design plays a significant role; intricate patterns will naturally take longer than simpler ones. My experience shows that if I’m embroidering a basic design, I can finish it in about 3 to 5 hours. However, for detailed projects, allocating 10 to 20 hours is realistic. Additionally, the amount of time dedicated each day influences the overall completion time. Choosing a comfortable workspace and allowing yourself to enjoy the process can enhance not only the experience but also the final product.
Are there any beginner-friendly patterns available?
Absolutely, there are numerous beginner-friendly patterns available across various crafts. Whether you’re into knitting, sewing, or paper crafts, you’ll find simple projects designed to help you build your skills without frustration. For instance, knitted dishcloths or basic tote bags are fantastic starting points. Check out our tutorials for step-by-step guidance. These projects emphasize clear directions and often include visuals to assist you along the way. Trust me, starting with approachable patterns can make all the difference in fostering your creativity!
What fabric is best for stocking embroidery?
Choosing the right fabric for stocking embroidery can significantly impact your final product. I personally favor using soft, tightly woven fabrics like cotton, felt, or linen for their durability and ease of stitching. Cotton provides a nice blend of structure and texture, allowing your designs to stand out. Felt is also a fantastic option for a more dimensional look and is forgiving for beginners. Avoid stretchy materials, as they can distort your embroidery and ruin your designs. Ultimately, the fabric you choose should complement your vision while being easy to work with.
Can I use my own designs for embroidery?
Absolutely, you can use your own designs for embroidery! Creating unique pieces using your personal artwork adds a special touch. To do this, you’ll need to convert your designs into a compatible format for the embroidery machine. Software tools like Adobe Illustrator or specific embroidery software can help with this conversion. Make sure to consider the size and stitch type when adapting your design, as these factors significantly affect the final appearance. Once your design is ready, you can select the threads and fabrics that best complement your artwork, transforming it into a stunning embroidered masterpiece.
How can I fix mistakes in my embroidery?
Mistakes happen, and the key is addressing them effectively. For minor errors, simply unpicking the stitches with a seam ripper and redoing them can work wonders. If you’ve snagged the fabric, use a fabric patch or iron-on stabilizer to reinforce it. Sometimes, adding embellishments like beads or a border can cleverly disguise a mistake. If the mistake is significant, consider reversing to the last completed section to ensure accuracy. Remember, every error carries the potential for creativity!
What tools do I need to start an embroidery project?
You’ll need a few essential tools to get started with embroidery. A good quality embroidery hoop is crucial; it keeps your fabric taut while you stitch. Choose your needle wisely. Opt for embroidery needles with a larger eye to accommodate different thread types. You’ll also need embroidery floss or thread, which comes in various colors and textures—pick whatever sparks joy! A pair of sharp scissors is essential for precise cutting. Finally, don’t forget fabric—start with cotton or linen for best results. With these tools, you’re ready to unleash your creativity!
Personalization adds a unique touch to your embroidery. By incorporating names, dates, or custom designs, I create pieces that are truly one-of-a-kind. This personal element transforms any project into a meaningful gift or keepsake.
Stocking kits come in various levels of complexity. I’ve seen simple projects like basic painting sets to intricate embroidery kits that challenge even seasoned crafters.
I firmly believe that consistent practice is the key to mastering embroidery. The more you stitch, the better your technique becomes, leading to more complex and beautiful patterns. Don’t underestimate the power of repetition!
**Online communities have become essential for artists like myself.** Engaging with like-minded individuals fuels my creativity, while shared experiences offer motivation and valuable support. It’s invigorating to connect with fellow crafters who inspire and challenge me.


