


As an Amazon Services LLC Associates Program participant, we earn advertising fees by linking to Amazon, at no extra cost to you.
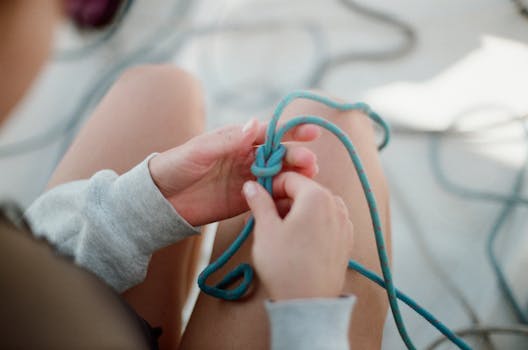
Practice on scrap fabric before starting
Exploring the benefits of using scrap fabric for practice can significantly enhance your crafting skills.
- Experiment with new techniques. Using scrap fabric allows you to test stitching methods, fabric manipulation, and appliqué finishes without fear of ruining your main project.
- Refine your skills. Repeated practice on small pieces helps improve your precision and confidence, making a noticeable difference when you switch to your final fabric.
- Avoid costly mistakes. Practicing on scraps prevents the heartache of cutting into a beautiful fabric only to discover that your technique needs more refinement.
- Play with colors and patterns. Scraps often include various prints and hues, giving you a chance to explore combinations that may not fit into your final design but help expand your creative thinking.
- Create test samples. This enables you to visualize the final outcome, allowing for adjustments in both technique and design before committing to your chosen fabric.
Best Practices for Binding on a Coverstitch Machine
Binding on a coverstitch machine can elevate your sewing projects, and I’ve gathered some invaluable tips from my own experiences that can help you achieve professional results.
- Choose the Right Binding Material: Opt for lightweight, flexible fabrics that won’t add bulk to your seams. Knits and cotton blends work beautifully.
- Prewash Your Fabrics: Always prewash your binding and main fabric to prevent shrinkage later. It makes a big difference in the final look.
- Use a Walking Foot: This ensures even feed and prevents stretching or puckering while you sew, allowing for a smooth binding process.
- Adjust Your Machine Settings: Experiment with stitch length and tension to suit your fabric choice. Getting this right is crucial for a clean bind.
- Pin or Clip Generously: Secure your binding well before you sew. This helps keep everything in place and ensures accuracy in your stitching.
- Practice on Scraps: Before binding your actual project, use leftover fabric to test your technique. It’s a great way to refine your skills without the stress.
- Finish with Quality Thread: Invest in good quality thread that matches your fabric. It enhances durability and improves the overall aesthetic of your project.
Technique 3: Bias Binding
Bias binding is one of my favorite techniques for finishing edges in a polished and professional way. This method involves using bias tape, which is cut on the bias of the fabric, allowing it to stretch and curve easily, making it perfect for rounded or irregular edges. I love that it adds a stylish flair and durability to my projects. To start, cut strips of fabric on the bias, usually at a 45-degree angle to the selvage. Then, fold the strips in half lengthwise and press for a crisp edge. Applying the binding is straightforward: align it with the edge of your fabric, sew it in place, and fold it over to the back. I find that pinning it first helps keep things neat. Finally, sew it down securely, either through the tape or just along the edge, and watch how it transforms your project into something extraordinary!
Materials Needed for Binding Techniques
A comprehensive selection of materials essential for various binding techniques in arts and crafts.
- Bookbinding glue: This is a crucial adhesive that remains flexible once dry, allowing pages to turn smoothly without tearing.
- Thread: Choose a strong, durable thread, such as linen or cotton, for sewing signatures together securely.
- Needles: Use bookbinding needles, which are thicker and have larger eyes to accommodate heavier threads.
- Cardstock or cover material: Prepare a robust cover that will protect the pages, offering durability and visual appeal.
- Paper: Select quality paper that suits your project’s theme and allows for a variety of mediums.
- Cutting tools: Reliable scissors or a craft knife will provide clean edges when trimming your materials.
- Ruler and bone folder: These tools are essential for achieving straight lines and crisp folds, enhancing the overall presentation.
- Clamp or press: This will help keep your project secure while the glue dries, ensuring a neat finish.
- Decorative elements: Consider using washi tape, fabric, or other embellishments to personalize your binding technique.
Apr 14, 2024 … Beginner tutorials on how to use a coverstitch machine. Step by step instructions and tips on how to avoid skipped and wonky stitches.
Jun 30, 2016 … I tried every method I could find to hem, topstitch, bind, and apply elastic to knit fabrics with a regular sewing machine. I wrote lists of …
I'm Johanna Lundström author of Sewing Jeans, Master the Coverstitch Machine, Fit for Knits and Sewing Activewear.
Nov 30, 2022 … I make swimsuits / pole wear so almost everything I stitch with is 4 way stretch fabric. I was looking at the Janome 1000CPX or the Brother …
Oct 10, 2017 … … coverstitch. :-D. Binding a V-neckline. Here I am showing how to use the Coverstitch machine to do both; attaching AND top-stitching the binding …
Tips for Achieving Professional Quality
Invest in high-quality materials. Using premium paints, papers, or yarn can make a world of difference in your projects. Practice consistent techniques. Mastering your crafting skills through repetition is key; practice makes perfect. Pay attention to lighting. Good lighting is essential for displaying colors accurately and identifying details in your work. Don’t overlook the details. These can elevate a project from average to exceptional when done thoughtfully. Take time to plan your projects. Sketching or outlining before diving in can save you frustration later. Experiment with different styles. Finding your unique voice can give your crafts a delightful twist. You can distinguish between amateur and high-quality work simply through careful craftsmanship. To truly shine, assess and adjust your technique regularly, asking for feedback when necessary. Professionals constantly evolve and improve; don’t hesitate to embrace constructive criticism to perfect your craft.
Choose the right fabric for binding
Selecting the appropriate fabric for binding can enhance the durability and aesthetic appeal of your project.
- Cotton is a favorite choice; it’s durable and easy to work with. This natural fiber handles both sewing and embroidery beautifully, making it ideal for various projects.
- Consider using a canvas for extra strength. If your binding needs to withstand wear and tear, the thicker texture can provide the robustness required for heavier items.
- Linen offers an elegant touch. It’s breathable and has a distinct texture, which elevates the overall look but may require more careful handling.
- Look into more unconventional fabrics like denim. This can add a unique flair to your bindings, especially for projects that lean into a casual aesthetic.
- Choose a fabric that matches the weight of the pages. The right balance prevents sagging or bulging, ensuring a polished finish.
Understanding the Coverstitch Machine
A coverstitch machine is an essential tool for achieving professional finishes on knit fabrics and hems. This machine is primarily used for hemming and topstitching, creating a decorative stitch that also secures the fabric edges. Unlike a regular sewing machine, which can only produce one type of stitch, a coverstitch can create either a double or triple row of stitching on the top, while forming a chain stitch on the underside. This unique capability makes it the go-to choice for sewing activewear and stretchy fabrics. Setting up a coverstitch machine requires careful attention to threading and tension, and it may initially seem daunting. However, once you get the hang of it, the results are incredibly rewarding. The ease with which it handles hems and seams allows you to elevate your sewing projects to a whole new level. It’s worth investing the time to master this machine if you’re serious about sewing garments that look like they came straight from a boutique.
-Use of various industrial sewing machines; Single needle, Overlock, Cover Stitch, Shoulder tape machine and bias binding machine. … –Proper sewing techniques …
August Ortega – Volunteer Instructor – Arts Bridging the Gap | LinkedIn
Final Thoughts on Coverstitch Binding Techniques
Coverstitch binding is an absolute game changer for finishing garments and crafts with a professional touch. I find it especially rewarding when my projects showcase clean, neat edges that not only enhance durability but also aesthetic appeal. Mastering this technique opens up a world of creative possibilities. Whether you’re working with knits or wovens, the right tension and stitch width can make all the difference. I often experiment with various fabrics and settings to achieve that perfect finish. Using a coverstitch machine significantly speeds up the process, but even a regular sewing machine with the correct foot can do the trick if you’re resourceful. Don’t shy away from trial and error; it’s part of the learning process. I encourage everyone to embrace this technique and integrate it into their sewing repertoire. Ultimately, the satisfaction of seeing your project come to life with a polished hem is incredibly fulfilling.
Common Mistakes to Avoid in Binding
One of the biggest mistakes I see in binding projects is choosing the wrong binding method for the material. For instance, using heavyweight books with flimsy glue can lead to disaster. Overlooking the importance of measurement is another critical error. Accurate measurements ensure pieces fit together seamlessly, which is particularly vital for covers and spines. Skipping the drying time while the binding sets can ruin your hard work. Patience is key, as rushing leads to misalignments and weaker bonds. Failing to reinforce edges or corners can also weaken your project. Use decorative tape or additional layers to enhance durability. Lastly, don’t forget to consider the aesthetics; picking colors or patterns that clash can turn a beautiful project into an eyesore. Binding can be tricky, but avoiding these common missteps will save you time and frustration.
Use coordinating thread colors
Choosing the right thread colors can significantly enhance your projects.
- Consider the fabric or paper color. Ensure your thread complements or contrasts sharply for a striking effect. Your choices can transform a simple piece into something extraordinary.
- Don’t be afraid to mix textures. Combining different thread types, like cotton and metallic, can add depth and interest to your projects.
- Play with color theory. Utilizing complementary colors can create balance, while analogous colors lend a more harmonious feel. Understanding these basics can drastically improve your aesthetic choices.
- Take lighting into account. Colors appear different under various lighting conditions. Test your thread in natural and artificial light to ensure it looks the way you intend.
- Experiment is key. Don’t settle on the first combination you find. Try a few options until something just clicks. The best way to discover what truly works is through hands-on experimentation.
- Create a thread palette. Gathering an array of colors together can give you a visual reference that’ll make choosing colors for future projects much easier.
Technique 4: Binding with Decorative Stitching
Binding with decorative stitching transforms any project into a personal statement. I love how it adds an element of uniqueness and sophistication to simple bindings. Whether it’s a handmade notebook or a quilt, the right stitch can elevate the overall aesthetic significantly.
There’s a wide variety of stitches to choose from. Techniques like whip stitching, cross-stitching, or even blanket stitching can create visually striking patterns. I personally enjoy using contrasting thread colors to really make the stitching pop against the fabric or paper. This not only serves a functional purpose but also acts as a decorative element.
Incorporating decorative stitching into your binding method also allows for more creativity. Think outside the lines and combine different colors, textures, and stitching styles. The beauty of this technique lies in its versatility. It suits projects ranging from simple journals to elaborate fabric art, letting absolute creativity shine through.
Technique 1: Simple Binding
Simple binding is an essential technique that can elevate your paper crafts significantly. This method is perfect for those who want to create handmade books, journals, or scrapbook-style projects without complicated tools.
To start, you’ll need just a few materials: a stack of paper, a sturdy piece of cardboard (for the cover), thread, a needle, and a pair of scissors. My favorite part? You can personalize the cover with your own artwork or decorative paper.
Begin by cutting your paper to the desired size. For the cover, ensure it’s slightly larger than your pages for a polished look. Next, stack your papers and use two or three evenly spaced holes along one side for your binding. Make sure to use a sharp tool to avoid tearing.
Thread your needle, and with a simple over-and-under stitch, bind the pages together. Secure the final knot on the outside for a neat finish. With this straightforward technique, you’ll be able to create professional-looking projects in no time!
Technique 2: Double Fold Binding
The Double Fold Binding technique is a fantastic method that adds a professional touch to your handmade books and projects. It’s straightforward and can be executed with basic materials. Start by cutting a strip of fabric or paper that is twice the width of your spine plus the thickness of the covers. Fold it in half lengthwise to create a neat edge. This not only strengthens the spine but also offers a clean finish that elevates your project. After folding, attach the strip to the spine of your book, ensuring it wraps around the edges of the cover. Use a strong adhesive for durability. I prefer a fabric adhesive because it allows for a bit of give, but hot glue works as well if you’re careful with application. Don’t forget to press firmly to secure everything in place. Finally, trim any excess and enjoy the polished look of your completed piece. This method is perfect for anyone looking to enhance their crafting repertoire with a binding technique that impresses.
Essential Tools for Binding
To create durable and professional-looking bindings, a few essential tools are non-negotiable. First on my list is a reliable binding machine, whether it’s a thermal or comb binder. These machines save time and ensure every page is securely fastened. A good quality hole punch is equally crucial for precise alignment, especially when working with multiple sheets. You’ll also need a sturdy cutting mat to protect surfaces while trimming your covers and pages to size. A craft knife paired with a metal ruler guarantees clean cuts, essential for that polished look. For those opting for hand-binding methods, a needle and heavy-duty thread are must-haves. Lastly, don’t overlook decorative elements like washi tape or book cloth that can add flair and personality to your projects. These tools form the backbone of any binding endeavor, and investing in them elevates your craft immensely.
Can I use a coverstitch machine for regular sewing?
Coverstitch machines are not designed for regular sewing tasks. They excel at finishing hems and giving your garments that professional look, but they aren’t equipped for standard sewing techniques like straight stitching or zigzagging. If you attempt to do regular sewing with a coverstitch machine, you’ll likely struggle with fabric feeding and stitch creation. Save your coverstitch machine for its intended purpose to maintain efficiency and quality in your projects. For versatile sewing needs, invest in a traditional sewing machine instead.
What is a coverstitch machine used for?
A coverstitch machine is an essential tool for finishing knit garments. It creates a professional-looking hem that is both stretchy and durable. I often use it for hemming T-shirts, leggings, and activewear. Unlike standard sewing machines, a coverstitch allows for a flat, chain-like stitch on the front with a classic two-thread or three-thread configuration on the back. This design prevents fabric from stretching out of shape, making it ideal for stretchy materials. It’s a must-have for anyone serious about sewing garments with a polished finish.
What types of fabric work best for binding?
Cotton fabric is my top choice for binding due to its sturdiness and ease of handling. It’s versatile and comes in a vast array of colors and patterns, allowing for great personalization. Additionally, quilted fabrics provide extra durability, making them ideal for items that undergo frequent use. For a softer touch, I lean towards flannel; it offers a comfortable feel while still holding up well. Avoid stretchy or slippery fabrics like jersey, as they can complicate the binding process and lead to frustrations. Ultimately, the right fabric depends on your project’s needs, but these are my go-to selections.
Are there any specific thread types recommended for binding?
For binding projects, I often recommend using cotton thread or linen thread. Cotton thread is versatile and available in various weights, making it perfect for most materials. Linen thread offers strength and durability, ideal for heavier fabrics. I find that using a waxed thread enhances the finish and prevents fraying, which is crucial for longevity. Additionally, poly-cotton blends can work well for projects requiring a bit of stretch. Remember, the right thread type can greatly influence the quality of your binding, so choose wisely!
What should I do if my binding is not lying flat?
Ensure that your binding is adequately secured at both ends. If the binding is too tight or too loose, it won’t lie flat. I recommend adjusting the tension when binding your projects. Additionally, using a higher quality adhesive can help eliminate warping. If the issue persists, consider applying gentle pressure with a weight or book for a few hours. Also, check that you’re using the right materials; certain papers or fabrics can exacerbate this problem. Experimenting with different techniques can lead to better results.
How do I troubleshoot binding issues on a coverstitch machine?
First, check the threading process; incorrect threading is often the culprit. Ensure the machine is correctly threaded, with each thread following its designated path. Next, examine the tension settings. If the tension is too tight or loose, it can lead to binding. Adjust each tension dial methodically until you achieve a balanced stitch. Also, pay attention to the presser foot pressure. Too much pressure can cause the fabric to bunch and bind. Lastly, inspect the needles for damage or dullness; replacing them can resolve many binding issues. Don’t overlook any burrs on the throat plate or feed dogs.
Can I add embellishments while binding with a coverstitch machine?
Yes, absolutely! Adding embellishments while binding with a coverstitch machine can make your projects really stand out. You can incorporate items like lace, ribbon, or even decorative stitches right into your binding process. Just ensure that your embellishments are flat enough so they won’t interfere with the machine’s foot. Experimenting with placement and technique is key! I’ve found that layering adds depth and creativity to simple bindings. Just be cautious with fabric thickness and tension adjustments, as this may affect the stitch quality.
Binding transforms the edges of your garment, providing a clean, polished look that’s hard to achieve otherwise. It elevates even the simplest designs, showcasing attention to detail and craftsmanship.
Trying various binding methods transformed my projects into entirely new expressions of creativity. Each technique brought distinct textures and visuals, refreshing my approach to art.
Always test on scrap fabric to ensure the desired outcome. I learned the hard way that testing saves time and materials. It allows me to adjust settings and colors without wasting my main project fabric.
Proper threading and tension settings are crucial for success. **Incorrect tension can lead to uneven stitches, fabric puckering, and wasted materials.** I always double-check my settings for perfect results.
Using specialized tools like an electric binder or a quality glue gun will make your binding projects faster and neater. I’ve found that having the right equipment eliminates frustration and enhances my creativity.
Rushing leads to mistakes and frustration. I’ve found that taking the time to perfect each step results in work I’m proud of. Patience is key to achieving high-quality projects.
As an Amazon Services LLC Associates Program participant, we earn advertising fees by linking to Amazon, at no extra cost to you.


